

Bingo isn’t just for old people. It can also be a fun review game for Spanish vocabulary! This post explains step-by-step how to make digital and paper Bingo games for your classes.
All you need is a topic with at least 24 vocabulary words, clipart for those words, and you’re good to go!
📝💻 You can play bingo on paper or digitally to review vocab with your students – check out my directions below for both options.
If you want even more review game ideas, check out Elisabeth’s post.
The Paper Version 📝
If your classroom is in-person and paper is an option, then bingo is a fun review game!
Here’s how you can set it up:
1. Choose a topic with at least 24 vocabulary words.
Food, clothing, school supplies & subjects, present tense verbs… all viable options.
2. Make sure you have clipart for each vocab word.
Ideally, students should be familiar with it in advance so they know exactly what each item is.
3. You have two choices…
You can either make the bingo boards in advance in powerpoint (and make sure they’re all different!), or you can print out a sheet of clipart for each student and have them cut the clipart out and arrange it on their bingo board in class.
I personally don’t like to waste class time letting students cut because they take 19 times longer than I’d like, but you do you.
How to Make Bingo Boards in Powerpoint
1. Open up Powerpoint.
(Duh).
2. Change the slide size.
Go to File > Page Setup > Custom. Make your slide 8.5″ x 11″. Click OK.

3. It’ll harass you about whether you want to scale up or scale down.
It doesn’t matter. Pick one.
I delete the title and subtitle boxes because they annoy me.
4. If you have a cute border to add to your slide, now is the time. If not, you can make a border.
Click Insert > Shapes. I personally like the rectangle with rounded edges, but choose whichever rectangle you like.
I like to leave a 1/2″ border around the edges, so I format the shape to 7.5″ x 10″.
Make sure the rectangle is centered. Make the “Shape Fill” transparent. Then make the “Shape Outline” whatever color and weight (thickness) you like. You can also make it dashed.

5. Write “Lotería” at the top if you want.
If you want to have a spot for students to write their names or you want the top of the paper to say “Lotería”, then add a text box and put that at the top.
In that case, move your border down so it fits.
6. Insert a 5×5 table onto your slide.
Go to Insert > Table. Choose 5 columns and 5 rows, and click Insert.
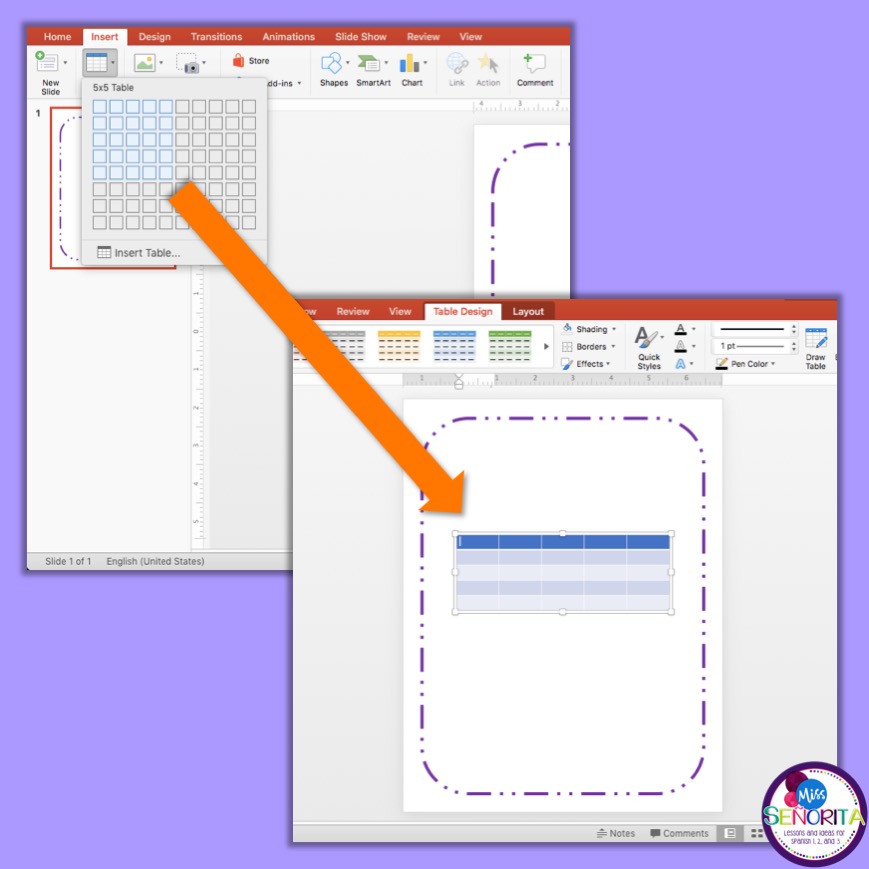
7. The table is hideous, so we must beautify it. 👹
In the Table Design tab, click Shading and choose “No Fill”. Click Borders and choose “Inside Borders”.
Drag your table so it fits just inside the border.
Type libre into the center spot.
 |
| Et voila! |
8. You might be done…?
If you’re going to give students a sheet of clipart to cut out and put on their bingo sheet – you’re done! Just make sure the clipart you give them is sized so it fits inside the bingo boxes. 🙃
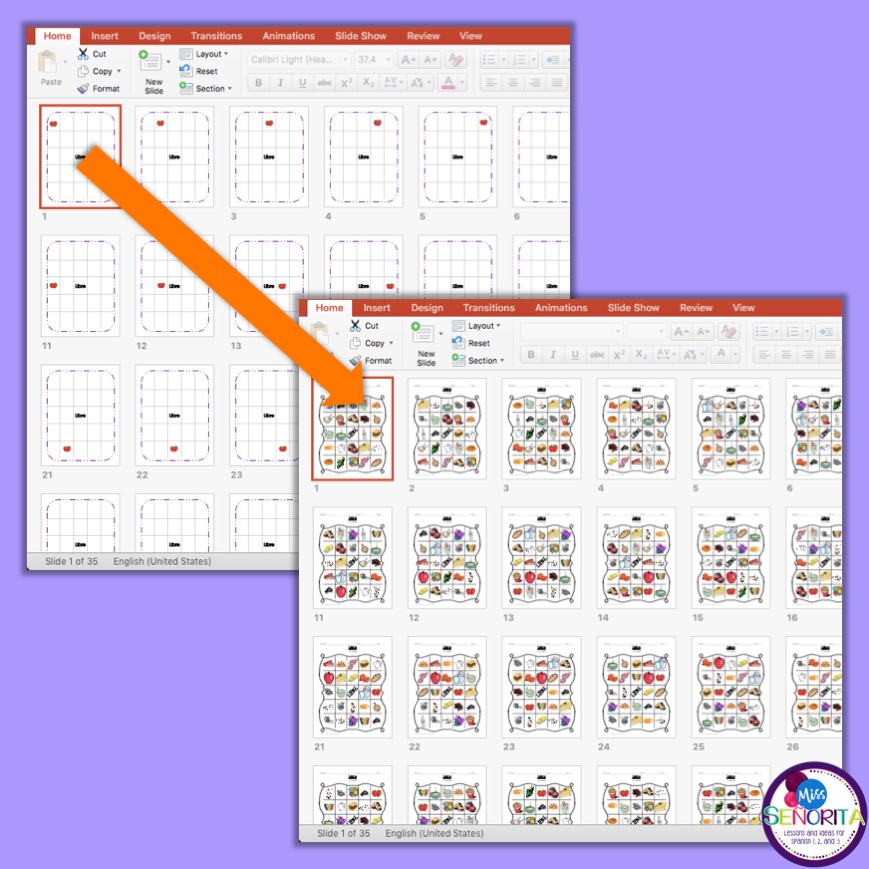
If you’re going to create different pre-made bingo sheets for your students, duplicate your bingo sheet for your biggest class size.
Then copy your clipart one at a time into the powerpoint Bingo sheets, putting each image in a different spot for each sheet.
I do this systematically. If I’m creating bingo sheets for food vocab, then I start with one clipart image and I paste it into a different spot on most (not all) bingo sheets. If I have more than 24 clipart images, then I don’t put every image on every sheet.
Does it take a while to do? Ummmm… yes.
It’s a task for something to do while you watch The Crown. Instead of scrolling through your Instagram feed.
But you’ll have as many different bingo sheets as you want! 😁
Some Other Considerations
You need a list of vocab words that you included on the bingo sheets so 1) you aren’t calling vocab that no one has and 2) you don’t call vocab more than once in the same game.
It’s easiest if this is in checklist format, so you can check words off as you go through each game.
The Digital Version 💻
Okay, let’s talk about how to play bingo virtually.
Maybe you have everyone in front of you in your classroom, and everyone has an iPad or Chromebook. Maybe you’re teaching virtually from your living room. We can make this work!
How to Make Bingo Boards in Google Slides
1. Just like the in-person version, you need a topic with at least 24 vocabulary words + clipart for each image.
2. Create a new Google Slide.
Open up Google Drive and click New in the upper left corner, and choose Google Slides.
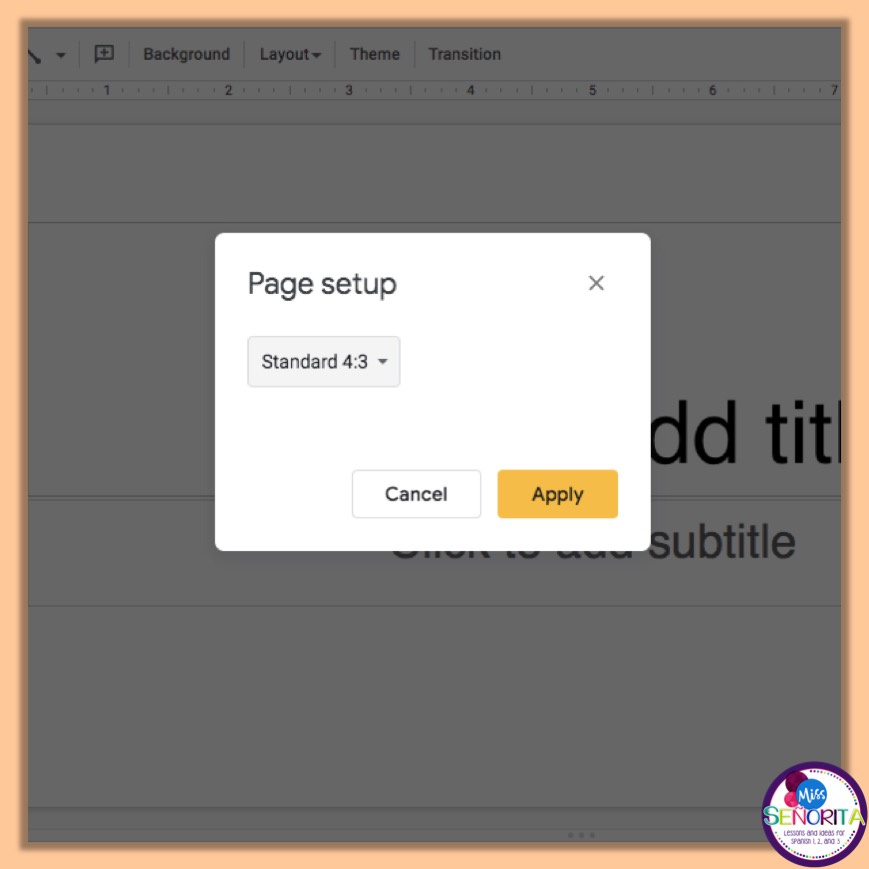
3. Make the slide bigger.
Go to File > Page Setup. Choose “Standard 4:3”, and click Apply.
This isn’t completely necessary, but it gives you more space to work with, which is definitely helpful.
4. Delete the title and subtitle boxes.
You want one half of the slide for a bingo board, and the other half with draggable clipart that students can move onto the bingo sheet, plus a corner for bingo “chips” that students can drag onto the clipart when the words are called.
5. Let’s start with the bingo board.
Go to Insert > Shape > Shapes. Click a rectangle (with pointy edges) and then click on the slide to place it.
Drag the edges of the rectangle so it is close to the borders on the top, bottom, and left, and fills a little over half the left side of the slide. Make the Fill Color white and then the Border Color whatever color you like. Finally, give it 2 or 3 pt thickness.
Go to Format > Format Options. A panel appears on the right side. Choose Drop Shadow, and adjust the Transparency, Angle, Distance, and Blur Radius until it looks nice.

6. Write “Lotería” at the top of the board if you want.
If you want to write the name of the Lotería game at the top of the “board”, then add a text box and type that in.
7. Your bingo board needs lines.
Go to Insert > Table and insert a 5×5 table.
Drag the table so it fits inside the bingo board rectangle, with a little room on the edges.
Select the whole table and make the Border Color black.
This will make the outside border black also. You can either make the edge of the table touch the rectangle, or you can individually click each outside border line and click “transparent” for the Border Color. IMO it looks nicer if the lines of the table don’t touch the rectangle, but it takes longer to click each outside line and make it transparent.
Finally, type Libre into the center box.

7. It’s time to make the Clipart Bank on the right side of the slide.
Insert a text box and give your students directions, so they know what to do. My directions are: Drag 24 of the cliparts below onto the Bingo Board to the left. One clipart per square!

8. Give your students all the clipart options.
Copy and paste all the clipart onto the right side of the board. Size them so they’re smaller than 1″ tall or wide (so they fit onto the bingo board square), and arrange them neatly.
9. Now make the Bingo “chips”.
Insert a rectangle into the corner where you want to keep the Bingo Chips. Make the border black and the center either white or transparent.
Then, insert a text box into the rectangle and type “Bingo Chips”.
After that, insert a circle onto the board. Give it the Fill Color of red (or whatever bold color you like) and a transparent border. Make the circle the right size to fill a box on the Bingo Board.
10. Copy/paste the bingo “chips” and layer them.
Go to View > Zoom and choose 50%.
Move the bingo chip circle onto the gray space off the slide, then copy/paste it as many times as you think students will need chips. 25 should be sufficient.
Select all the bingo chips, and then right-click and select Align Horizontally > Center. Finally, right-click again and select Align Vertically > Middle.
Lastly, rag all the chips to the Bingo Chips box. They’re layered!

Et voila! Digital bingo is ready to go! Assign each student their own version, so that everyone can play simultaneously.
Give students 5 minutes to set up their bingo board by dragging clipart over to the 24 spaces on the board, and then you can call out words one at a time for students to mark with their chips.
When a student gets 5 in a row – they call out bingo!
I find bragging rights is a pretty good prize, but maybe you can come up with a better digital option.

If you feel like this was a lot of work just to read – not to mention to actually make it yourself, you can bet I’ve already got a few sets done for you in my TpT store.


5 Comments
Hi Jessica
Thanks for doing all the grunt work on this. It is awesome. I changed the clipart and words for our class topic. We will be meeting virtually via Zoom with our 7th and 8th graders. When I made the “bingo” chips and have them in their pile I noticed when I tried to see how they worked, I noticed that they don’t show up on top of the clip art image. Can you help me correct that?
Thanks
Maura
Hi Maura!
I’m so glad this was helpful for you! I think your issue means that the bingo chips aren’t layered on top of the clipart. You want the bingo chips as the very top layer so they cover the clipart. Select all the bingo chips, right-click > Order > Bring to Front. I hope this helps!
Jessica
Thank you
It worked!!
yayyyyy 🙂
Super, muchas gracias por explicar con todos los detalles. Las instrucciones son perfectas y muy útiles.